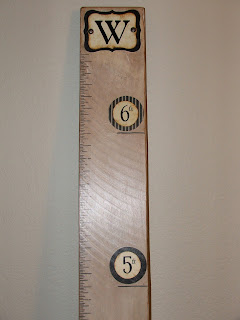
I am excited to say that I have completed another project off my list! I am happy with it. I know my eldest son doesn't like it very much. He says he doesn't like that it looks antique,but oh well. You get what you get and you don't throw a fit,right. I am sorry my pictures are not the best,it was kind of hard to take pictures of because it is so long. Anyway here it is.
We have all this wood in our shed that was left from the previous owners of our house,so this was pretty cheap. We also have a bunch of little cans of stain that I have been experimenting with.
How did I do this?
I first sanded and primed the wood.
I then painted with white with a little brown and some yellow,but mostly white.
The sides are painted black.
I then used a very large ruler to draw the lines and then I painted them.
After painting the lines I sanded it all down. (Here is what it looked like before I added the chestnut stain)
After it wall all stained, I decoupaged my paper on.
To make the paper look antique I used distress ink around the edges.
Here are some of the supplies I used.
(I didn't end up using the little piece of wood or the stickers in this photo.)
For the finishing steps I added my vinyl numbers and then coated the whole thing with decoupage.
Here is my baby girl testing out the new product.
Saturday, February 26, 2011
Tuesday, February 22, 2011
Decorative door stop
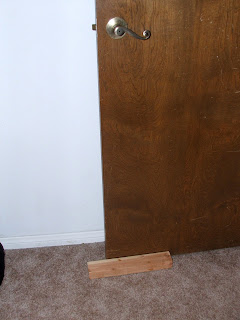
I don't know about you,but I like to keep my bedroom door open at night so I can hear the kiddos. The only problem is that my door will not stay closed. I usually put a sock or some article of clothing in front of it to keep the darn thing from closing. Well I decided it was time for a change! The people that owned our house before us left all these random pieces of wood around. Have a look
This was still better than the clothes on the floor. Not by much. So I got some fabric and hot glue out and dolled it up a bit. I also used some decorative nails to keep it in place.
Kind of a funny project,but it was really fun,I want to do one in all the rooms. And it was stuff I already had!
Monday, February 21, 2011
Valentines pillows
Alright so the day after Valentines I finally got the bug to make something festive. This is a very easy project and it was free. I have been trying to stick with projects that are free or almost free. I am going to write this in steps,it is easier that way.
#1 Get scrap fabric or ribbons in various sizes
#2 Sew the pieces together
#3 Iron sewn pieces to some double stick fusible web. I used the brand " Steam-A-seam2" you can find it a Joanns
#4 Randomly trace shapes on paper side with cookie cutters or draw shapes .
#5 Cut out shapes and Iron onto fabric. I used a white flannel 6"x6" square. Sew aroud heart shapes with strait stitch.
#6 Sew other scrap fabic around flannel and make sure to square it off.
#7 Iron top piece flat ,then sew a fabric sqaure that is the same as the top piece,leave an opening for your cotton
.#8 Stuff and slip stitch the bottom
#9 Your done
Sunday, February 20, 2011
January furniture makeovers
I have dedicated this new blog to my crafts. I am excited to share ideas with everyone. Here are some of my projects I worked on last month.
Then I came upon a page in my calendar and from there it all came together.
Weekend warriors party
This table was on our back patio when we moved in 2 1/2 years ago. It has been there up until
last month.I wasn't sure what to do with it so I just started painting.
I painted it with a green that I already had. So it was cheap ,but looked to 70'sThen I came upon a page in my calendar and from there it all came together.
I am really happy. I hope you like.
Now this project is book case for my boys room.
This Bookcase has been in our garage since this August.
My boys got to help with this one. I figured that since it was going
in their room they would appreciate it more if they saw all the work put into it.
Now they have a fun place to put their books and I have a cleaner garage!
I am linking to:
Weekend warriors party
Subscribe to:
Comments (Atom)


